In this tutorial, we will see how we can resolve the error “FATAL: Peer authentication failed for user *” in PostgreSQL. It is super simple to resolve this issue which takes a maximum of ten minutes. So without wasting time, let’s get started!
Reason Behind the Peer authentication failed Error
First of all, it is very important to understand the reason behind getting the error “FATAL: Peer authentication failed for user”. Before that, let’s see what a peer connection means in PostgreSQL.
When you install PostgreSQL on Linux/Ubuntu and other UNIX-like operating systems, the system automatically creates a user with the name postgres. Now you might be thinking, hey, what this user has to do with the PostgreSQL server? Let me tell you.
When you try to log in to the PostgreSQL client using the command sudo -u postgres psql , it checks if there is a user present on your OS having the username you entered, in our case- postgres. If yes then it will not ask you to enter a password and you will get logged in automatically. But, if the username you are logging in with is not present as an OS user, you will get an error that the user is not present.
This type of authentication is called a peer login method. In this method, there is no password set by default when you install the PostgreSQL server. Only a user of the name postgres is created.
Now let’s see the reason for getting this error.
As said earlier, the username postgres is created by PostgreSQL without any password. It uses the peer connection method for logging you into the PostgreSQL client. However, when you try to login into your PostgreSQL client using the command psql -U postgres, PostgreSQL will need you to log in using the password because it will not check the OS user of the same name this time. This is because PostgreSQL client authentication for the user postgres is set to the peer connection login method.

The login settings are present in the client authentication configuration file. We need to change the settings in order to let our user log in using the password.
So, let’s do that.
Step 1- Set or Change the password
If you have freshly installed the PostgreSQL setup and didn’t set up the password yet, you can follow the steps below to set the password.
If you have already set up the password but now don’t remember it, you can follow the same procedure.
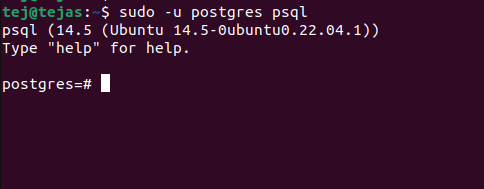
- First, log in to the PostgreSQL client using the peer connection method. For this, type the command and enter the password of your OS user (because we are using the sudo command)-
sudo -u postgres psql
- Note that, -u is in the small case. Here, this command will first switch the user to postgres and then enable the psql client. This way, you will automatically be logged in to the PostgreSQL client.
- Now enter the following command to set/change the password for the user of PostgreSQL, in our case, the username is postgres.
\password postgres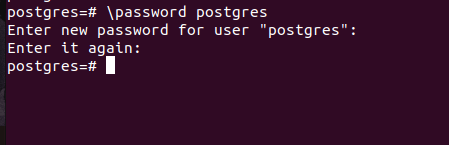
- The password has been successfully set/changed. Now we can get out of PostgreSQL using the
\qcommand and go to the next step, which is updating the configuration settings of the client authentication.
Step 2 – Update Client Authentication Configuration Settings
All the client authentication configurations are present in the pg_hba.conf file which is generally located in the /etc/postgresql/[version]/main/ or /var/lib/pgsql/data/pg_hba.conf directory. However, you can use the locate pg_hba.conf command to locate the file.
Now open the file using any GUI text editor or a CLI text editor such as nano. Here, I am going to use the nano. I will enter the command sudo nano /etc/postgresql/14/main/pg_hba.conf to open the configuration file. You can use other editors also such as notepad, TextPad or Wordpad.
Scroll down to the end where you will see some configurations as shown in the image below.
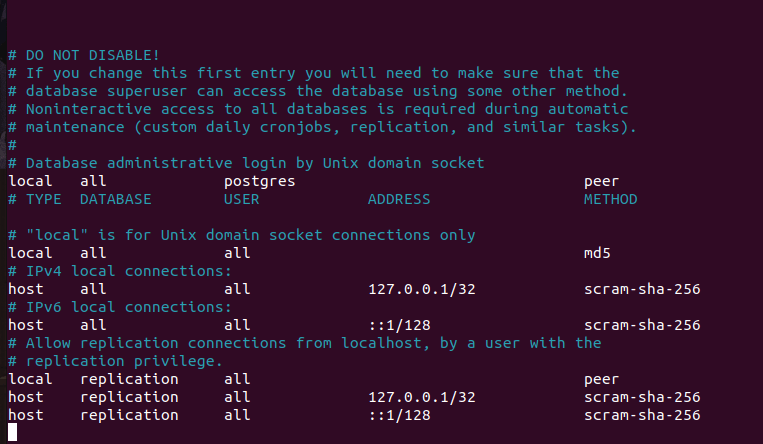
Here, we need to change only one setting.
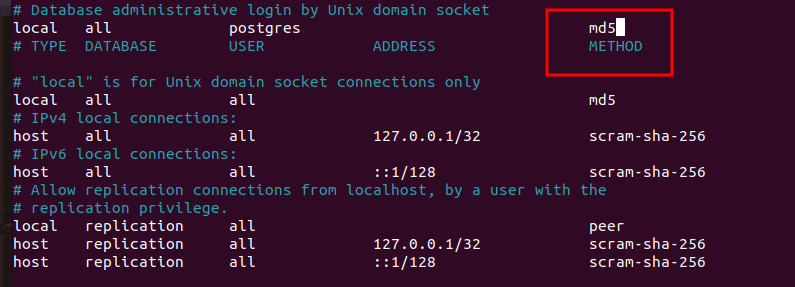
You can see there, the method for the user postgres is set to peer. We just need to change it to the md5.
Simply, change this-
local all postgres peerto this-
local all postgres md5Now you might be wondering what is md5. Let me tell you quickly.
There are three methods to log in.
peer– means it will trust the identity (authenticity) of the UNIX users. So not asking for a password.md5– means it will always ask for a password, and validate it after hashing withMD5.trust– means it will never ask for a password, and always trust any connection
Step 3 – Restart the PostgreSQL Server
Now you are all set to use the password for logging in. You just need to restart the PostgreSQL server for changes to take place.
To restart the PostgreSQL server, use the command- sudo systemctl restart postgresql
That’s it. Now you can log in to the PostgreSQL client using the command psql -U postgres.
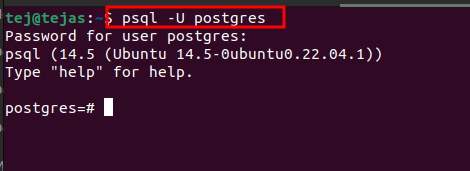
As you can see, now we can successfully log in to the client using the password.
Note that, you can now use both login methods- peer connection using the command sudo -u postgres psql and password using psql -U postgres. Don’t use -u and -U interchangeably here. Here, -u and -U have different meanings.
Conclusion
This is a quite an interesting topic because almost everyone who gets engaged with PostgreSQL as a beginner faces this problem. Not only on ubuntu but also in other programming languages/frameworks such as ruby on rails, you face this problem while connecting with the database. So, it is a quick and easy guide that may save you a lot of time.
Reference
Here is the StackOverflow thread on the same problem with multiple solutions. If our guide is not able to solve the error for you, this thread might help.