In this tutorial, we will learn to create multiple triggers on the same table for the same event and action time. It looks difficult to achieve but believe me, it is as simple as creating a simple trigger. We will start with the introduction and prerequisites and then go through syntax and examples. Stay with us till the end to learn the topic effectively.
Before We Start
Before starting the tutorial, you should have a basic understanding of the MySQL triggers. You can read our guide on the introduction to MySQL triggers if you are new to the topic. We have created individual tutorials for the different types of triggers that you can find on our site.
Introduction and Prerequisites
Until now, we have been creating a single trigger on a single table. But today, we will create two triggers of the same action time and same event on the same table. For example, we will create a trigger called “trig_a” of time and event BEFORE INSERT on the table “XYZ”. On the same table, we will create a trigger named “trig_b” of the same action time and event, i.e., BEFORE INSERT. Let’s find out how we can achieve this.
You can create multiple triggers of the same action time and event on the same table only in the MySQL version 5.7.2 +. The older versions of MYSQL don’t support this.
Syntax to Create Multiple Triggers on the Same Table
To create multiple triggers of the same action time and event on the same table, the following is the correct syntax that is provided by MySQL.
CREATE
TRIGGER [IF NOT EXISTS] trigger_name
trigger_time trigger_event
ON table_name FOR EACH ROW
[trigger_order]
trigger_bodyCode language: SQL (Structured Query Language) (sql)
If we simplify the syntax, it will look like –
CREATE
TRIGGER [IF NOT EXISTS] trigger_name
{BEFORE|AFTER}{INSERT|UPDATE|DELETE}
ON table_name FOR EACH ROW
{FOLLOWS|PRECEDES}
trigger_bodyCode language: SQL (Structured Query Language) (sql)
If you know the trigger topic already, you must be familiar with all the terminologies except the trigger_order.
trigger_order – You can have multiple triggers on the same table. However, triggers activate in the order they were created. If you want to activate the trigger in a particular order, you can specify using the FOLLOWS and PRECEDES statement.
To activate the new trigger before the existing one, use PRECEDES; whereas FOLLOWS clause is used to activate the new trigger after the existing trigger.
Examples of Multiple Triggers
Before creating the triggers, we need a base table with the data in it. Below is the table description that is already created in our database. We will create the triggers on this table (laptops).
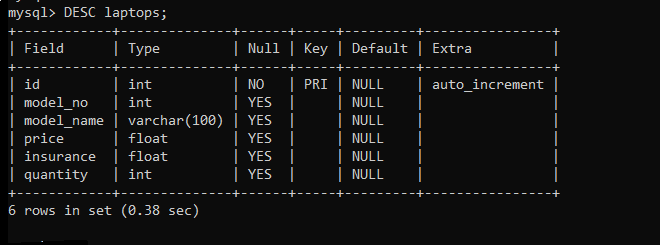
Here, we are storing the details of the laptops such as model_no, model_name, price, insurance and quantity. Let’s display the data in the table.
SELECT * FROM laptops;Code language: SQL (Structured Query Language) (sql)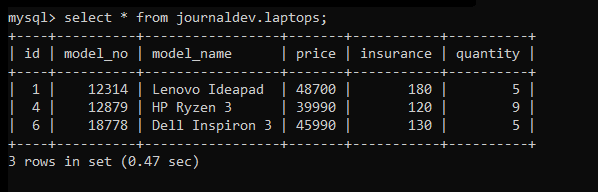
Now, we will create two BEFORE UPDATE triggers, price_log_trigger and user_log_trigger. The price_log_trigger will store the updated price inside the table ‘price_logs’ every time the price is changed in the laptops table. On the other hand, the user_log_trigger will store the information about the MySQL user who changed the price of the laptop in our database system in the table ‘user_logs’.
let’s create a price_logs table first in which we will insert a new row with the old price and new price every time the price is changed in the laptops table.
Creating the Tables and Triggers
The price_logs will have the following attributes- auto_incremented id, model_no, old_price, new_price, and updated_at.
CREATE TABLE price_logs(
id INT PRIMARY KEY AUTO_INCREMENT,
model_no INT,
old_price FLOAT,
new_price FLOAT,
updated_at DATETIME DEFAULT NOW()
);Code language: SQL (Structured Query Language) (sql)
Now, let’s create a BEFORE UPDATE trigger on the table “laptops”.
DELIMITER //
CREATE TRIGGER price_log_trigger
BEFORE UPDATE
ON laptops FOR EACH ROW
BEGIN
INSERT INTO price_logs(model_no,old_price,new_price)
VALUES(old.model_no,old.price,new.price);
END
//Code language: SQL (Structured Query Language) (sql)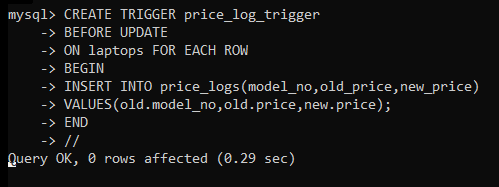
Let’s test the price_log_trigger trigger by updating the price in the laptops table.
UPDATE laptops
SET price = 49990
WHERE model_no = 12314;Code language: SQL (Structured Query Language) (sql)
Display the laptops table first to check if the changes took place. Then we will display the price_logs table to check whether our trigger worked or not.
SELECT * FROM laptopsCode language: SQL (Structured Query Language) (sql)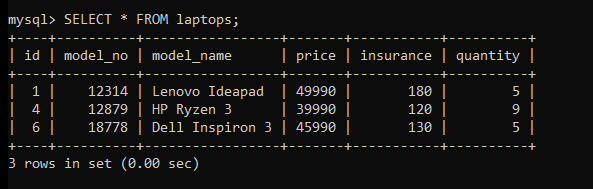
SELECT * FROM price_logs;Code language: SQL (Structured Query Language) (sql)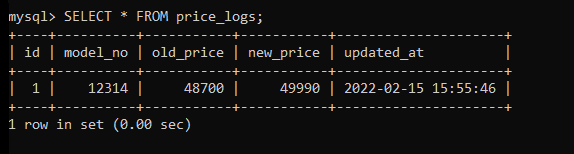
As you can see, the new row is inserted into the price_logs table, which means our trigger is working fine.
Now, let’s create a second table to store the information of the user who makes changes to the ‘laptops’ table. You can add the new column to the price_logs table but for the demonstration purpose of the multiple triggers, we are creating another table.
CREATE TABLE user_logs(
id INT PRIMARY KEY AUTO_INCREMENT,
model_no INT,
updated_by VARCHAR(100),
updated_at DATETIME DEFAULT NOW()
);Code language: SQL (Structured Query Language) (sql)
Let’s create a BEFORE INSERT trigger on the laptops table which will insert a new row into the user_logs table.
Note that, we are creating two triggers of the same event and action time. We want to execute the price_log_trigger trigger before the user_log_trigger trigger. For that, we will use the FOLLOWS clause while creating the new trigger.
DELIMITER //
CREATE TRIGGER user_log_trigger
BEFORE UPDATE
ON laptops FOR EACH ROW
FOLLOWS price_log_trigger
BEGIN
INSERT INTO user_logs(model_no,updated_by)
VALUES(old.model_no, USER());
END
//Code language: SQL (Structured Query Language) (sql)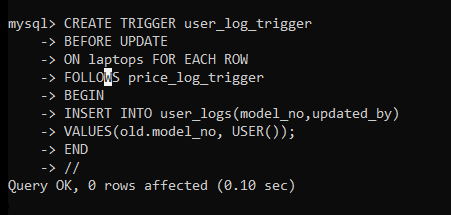
We have created both triggers successfully. Let’s test them by updating the laptops table data and checking if the new data is inserted into both tables.
Testing the Triggers
We will update the data of the laptops table. If we have created the triggers in the right way, we should get new data inserted into the price_logs table as well as the user_logs table.
UPDATE laptops
SET price=45999
WHERE model_no = 12879;Code language: SQL (Structured Query Language) (sql)
We know that the changes are reflected in the laptops table. We will display the price_logs and user_logs table to check if both triggers activated for the above query or not.
SELECT * FROM price_logs;Code language: SQL (Structured Query Language) (sql)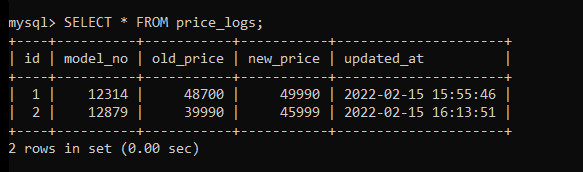
SELECT * FROM user_logs;Code language: SQL (Structured Query Language) (sql)
As you can see, the new row is inserted in both tables with the correct data.
Information About Triggers Order
If you display the triggers using the SHOW TRIGGER statement, you won’t find the order of the triggers. To find the order of the triggers of the same event and action time, you can use the following syntax.
SELECT
trigger_name, action_order
FROM information_schema.triggers
WHERE trigger_schema = 'journaldev'
ORDER BY
event_object_table ,
action_timing ,
event_manipulation;Code language: SQL (Structured Query Language) (sql)
Replace the “journaldev” with your database name.
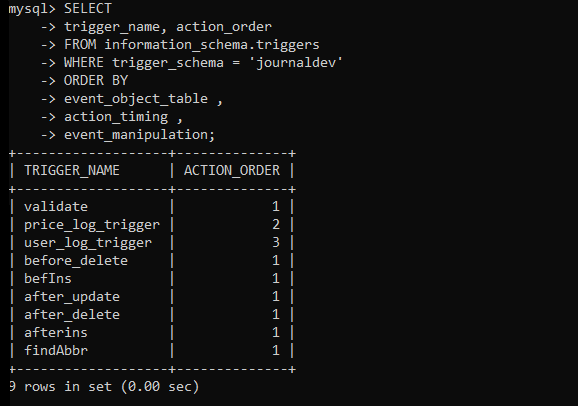
As you can see, the trigger order is displayed along with the triggers names.
Conclusion
So, we have learned to create multiple triggers of the same event and action time on the same table. We have shown you how the multiple triggers work with a simple example. You can implement this topic in more complex projects as per your use cases and the problem statement. I hope you have understood the topic, if yes then don’t forget to share it with your friends. See you in the next tutorial!