
MySQL is the most popular database only after Oracle due to its features and versatility. It provides us with every single feature that we need to create, maintain and scale the database. It allows us to create and manage users with appropriate privileges to manage the databases.
In this tutorial, we will learn how to create new users, assign privileges, view existing users, and revoke the privileges from the users. This is going to be an exciting tutorial and easy to understand for new MySQL programmers. Here we go!
Introduction and Prerequisites
Before diving straight into the topic, let’s understand what the MySQL user is. Think of a MySQL user as a person who has different privileges on the databases, like creating a new database or deleting the database. The admin of the MySQL DBMS decides which user can perform which action on the databases and accordingly assigns the privileges.
You should have installed MySQL or MariaDB on your computer. Apart from this, you should use a root or administrator account to create other user accounts. The root account exists by default on MySQL or MariaDB with the blank password. We are going to use a MySQL command-line client to perform operations on new users.
First of all, start the MySQL service from either workbench or XAMPP and then open MySQL or MariaDB command-line client. This is all you need. Now, follow the next steps.
Create New MySQL User
You can create a MySQL user using a single simple command. The user account is created for a particular host like localhost or an IP address such as 10.8.10.1. So, to create a new user account, you need three things- the username, the hostname, and the password for the user.
Note that we are first creating a user then assigning privileges to it.
You can create a new user by using the following command-
CREATE USER 'username'@'hostname' IDENTIFIED BY 'user_password';Code language: SQL (Structured Query Language) (sql)Replace the username with the new user name, hostname with the localhost (for local server) and user_password with the new password.
Here, you can set the hostname to localhost because we are using the same machine where the MySQL service is running. If you are willing to grant access to a remote host, you can set it as well using the IP address of that remote machine.
If you think that the new user should be able to connect from any host, you can use wildcard ‘%’.
CREATE USER 'username'@'%' IDENTIFIED BY 'user_password';Code language: SQL (Structured Query Language) (sql)When the new user is created, no privileges are assigned to it. You can assign privileges to the user using the following steps. Before that, let’s create a new user named “mysqlcode”.
CREATE USER 'mysqlcode'@'localhost' IDENTIFIED BY '123456';Code language: SQL (Structured Query Language) (sql)
After executing this command, no output is displayed. Which means the new user is created successfully.
Now the question is, how will you know if the user is created successfully and how to view all the users on your system. Let’s see.
Display All MySQL Users
The MySQL user account information is stored in the ” user ” table inside the database named “mysql”. When you display the “user” table data, you will get all the information about users like host, username, passwords, privileges, and so on. We can see all the user accounts on your MySQL DBMS using the SELECT statement.
SELECT host, user FROM user;Code language: SQL (Structured Query Language) (sql)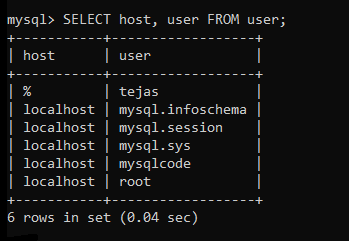
Here, we are only fetching the host and the username. If you use the SELECT * statement, you will get more than fifty columns of data. Because of this, the table data looks messy and becomes difficult to understand.
The user we created now is by default with no privilege. Let’s assign the privileges to it and then check how we can view the privileges of the user.
Grant Privileges to MySQL Users
There are a bunch of privileges available in MySQL. If you enter the command SHOW GRANTS, you will get all the privileges granted to the administrator account. If you want to see all the supported privileges in MySQL, check here. However, few of them are commonly used, such as –
- All Privileges- Assigns all permission to the user.
- CREATE- Grants privileges to create new database and table.
- UPDATE- Grants privileges to update the data in table.
- SELECT- Grants privileges to fetch the data from the table.
- DELETE- Grants privileges to delete the table data.
- DROP- Grants privileges to delete the database and table.
- INSERT- Grants privileges to insert data into table.
There are four different cases to assign the privileges to the MySQL user.
- Grant all permissions to user on all tables of specific database.
- Grant all permissions to user on specific table of database.
- Grant all permissions to user on all databases.
- Grant specific permissions to user.
We will learn how to assign privileges in all the above conditions one by one.
Grant all privileges to user on all tables of a database
Here, you can grant all permissions to a user on all tables of a specific database. That means the user can only be able to do operations on that particular database. Apart from the specified database, the user has no control over any other database.
GRANT ALL PRIVILEGES ON student.* TO 'mysqlcode'@'localhost';Code language: SQL (Structured Query Language) (sql)Here, we have assigned all privileges to user ‘mysqlcode’ on all database tables named ‘student’. The (*) symbol indicates all tables inside the student database.
Grant all privileges to user on specific table of a database
If you want to grant permission to the user for the specific table of a database, you can go this way. Once the permissions are granted, the user won’t be able to access and do operations on other tables apart from the specified table of a particular database.
GRANT ALL PRIVILEGES ON student.names TO 'mysqlcode'@'localhost';Code language: SQL (Structured Query Language) (sql)Here, we have granted all permissions to the user ‘mysqlcode’ on the ‘names’ table of a database named ‘student’.
Grant all privileges to user on all databases
You can allow the user to access and do operations on all databases available in your MySQL DBMS.
GRANT ALL PRIVILEGES ON *.* TO 'mysqlcode'@'localhost';Code language: SQL (Structured Query Language) (sql)We have granted all privileges to user ‘mysqlcode’ on all databases. If you see the syntax above, you will realize that first * denotes all databases, and the following * denotes all tables, which sums up as all tables of all databases.
Grant specific privileges to user
Using this syntax, you can grant specific permissions like SELECT, UPDATE, DELETE, etc., to the user. Note that you can grant the user only particular privileges on the above three use cases- particular table of a database, all tables of a specific database, and all databases. You can check it below-
Specific privileges on the specific table-
GRANT SELECT, UPDATE, DROP ON student.names TO 'mysqlcode'@'localhost';Code language: SQL (Structured Query Language) (sql)Specific privileges on all tables-
GRANT SELECT, UPDATE, DROP ON student.* TO 'mysqlcode'@'localhost';Code language: SQL (Structured Query Language) (sql)Specific privileges on all databases-
GRANT SELECT, UPDATE, DROP ON *.* TO 'mysqlcode'@'localhost';Code language: SQL (Structured Query Language) (sql)Display MySQL User Privileges
You can view the user table inside the databases ‘mysql’ by using a simple SELECT statement, but the output of that query is messy. Therefore, you can view the privileges of a particular user by using the following command.
SHOW GRANTS FOR 'mysqlcode'@'localhost';Code language: SQL (Structured Query Language) (sql)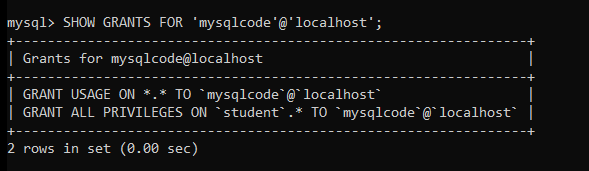
Revoke Privileges of MySQL User
You can revoke the privileges assigned to the user by using the following command. You have the option to revoke either all permissions or only specific permissions.
To revoke all privileges-
REVOKE ALL PRIVILEGES ON student.* FROM 'mysqlcode'@'localhost';Code language: SQL (Structured Query Language) (sql)All the privileges granted are revoked for the user ‘mysqlcode’ from the database ‘student’.
To revoke specific privileges-
REVOKE INSERT ON student.* FROM 'mysqlcode'@'localhost';Code language: SQL (Structured Query Language) (sql)Here, we have revoked only INSERT privilege from the user ‘mysqlcode’ from the database ‘student’.
Remove/Delete a MySQL User Account
MySQL allows you to remove any user account from the system completely. To perform this action, you have to use the DROP USER command. Check below-
DROP USER 'mysqlcode'@'localhost'Code language: SQL (Structured Query Language) (sql)This command will delete the user account from the system and its privileges.
Conclusion
In this tutorial, we learned to create, display and delete the MySQL user creation. Along with it, we also learned how to grant and revoke the permissions to the user on the database. The tutorial is very straightforward and doesn’t need any further explanations. I hope you have understood everything about the MySQL user accounts. Do try it on your system.