In this tutorial, we will learn everything about the AFTER UPDATE trigger in MySQL. Starting with the introduction and prerequisites, we will go through the syntax and then an example to understand the working of the AFTER UPDATE trigger. You can read our introduction to MySQL triggers from here if you are new to this topic. We have created individual tutorials for all types of triggers in MySQL which you can find on our website using the search box.
Introduction and Prerequisites
The AFTER UPDATE trigger activates after the UPDATE query is fired on the table. As soon as the data in the table gets modified by the UPDATE query, the trigger body executes and does its work.
It is nearly the same as the BEFORE UPDATE trigger but it activates after the data is modified in the table. Therefore, you can not modify the new values as well as the old values that are to be updated. However, you can access the new and old values using NEW and OLD keywords. Following are the restrictions on the AFTER UPDATE trigger.
- You can access the OLD values but can not modify them.
- You can access the NEW values but can not modify them.
- You cannot create the AFTER UPDATE trigger for views.
Syntax of MySQL AFTER UPDATE Trigger
You can use CREATE TRIGGER statement to create the AFTER UPDATE trigger in MySQL. Following is the correct syntax to create the trigger.
CREATE TRIGGER trigger_name
AFTER UPDATE
ON table_name FOR EACH ROW
[trigger_order]
trigger_bodyCode language: SQL (Structured Query Language) (sql)
Where,
- trigger_name – This can be any name but no two triggers of the same name can reside in the same database.
- trigger_order – This is the order in which the trigger activates. If two or more triggers are associated with the same table then you can use FOLLOWS and PRECEDES keywords to specify the order in which triggers should activate. However, trigger_order is an optional parameter.
- trigger_body – The set of operations after trigger activates are written in the trigger body. You can also have multiple SQL statements and those can be written inside the BEGIN…END statement..
Multiple statements can be written inside the trigger body using the BEGIN…END block. Remember to use any other sign/symbol you like instead of the semicolon, such as an ampersand, brackets, slash, or anything else. Following is the syntax to write multiple statements within the trigger body.
DELIMITER //
CREATE TRIGGER trigger_name
AFTER UPDATE
ON table_name FOR EACH ROW
[trigger_order]
BEGIN
trigger_body
END
DELIMITER ;Code language: SQL (Structured Query Language) (sql)
Where,
- BEGIN…END – It is a block in which you can write multiple SQL statements to perform specific operations.
- DELIMITER // – changes the delimiter from (;) to (//).
- DELIMITER ; – changes the delimiter from (//) to (;).
Example of MySQL AFTER UPDATE Trigger
Before creating the AFTER UPDATE trigger, we will create two tables. As the AFTER UPDATE trigger can not update the values of the current row, we will perform operations on the second table when the trigger activates on the first table.
Creating tables
We will create the first table to store the product id, name, and the latest quantity. The other table will store the id of the product along with the old quantity and new quantity.
Creating prod_details table-
CREATE TABLE prod_details(
id INT PRIMARY KEY AUTO_INCREMENT,
name VARCHAR(100),
quantity INT(10)
);Code language: SQL (Structured Query Language) (sql)
INSERT INTO prod_details(name,quantity)
VALUES("Face wash",23),("Face mask", 39),
("Hair shampoo",29),("Hair Gel",53);Code language: SQL (Structured Query Language) (sql)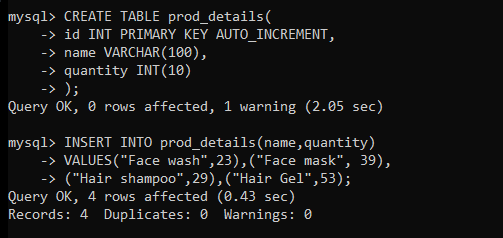
The table was created successfully and data was inserted too. Let’s display the table data.
SELECT * FROM prod_details;Code language: SQL (Structured Query Language) (sql)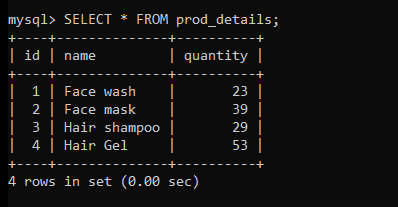
Perfect! Let’s create a second table to store the old quantity and new quantity of the product id.
CREATE TABLE q_details(
id INT PRIMARY KEY AUTO_INCREMENT,
prod_id INT,
old_q INT,
new_q INT,
updated_at DATETIME
);Code language: SQL (Structured Query Language) (sql)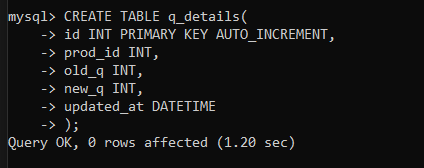
The table was created successfully. Let’s create the trigger now.
Creating the MySQL AFTER UPDATE Trigger
Using the trigger, we will insert the new row in the q_details table every time whenever the quantity is updated in the prod_details table.
We will create the trigger on the prod_details table and insert the new data into the q_details table.
CREATE TRIGGER after_update
AFTER UPDATE ON prod_details
FOR EACH ROW
BEGIN
IF OLD.quantity!=NEW.quantity THEN
INSERT INTO q_details(prod_id,old_q,new_q,updated_at)
VALUES(OLD.id,OLD.quantity,NEW.quantity, NOW());
END IF;
END
//Code language: SQL (Structured Query Language) (sql)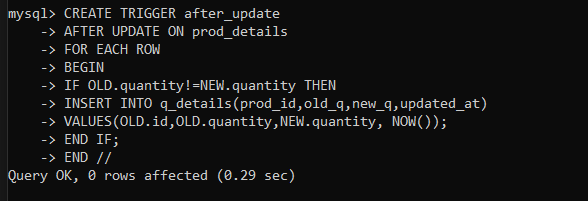
Here, we have compared the old quantity and the new quantity. If they are not equal, only then we will insert the new row into the q_details table.
The NOW() function is used to insert the current date and time to track when the new row is inserted.
Let’s test the trigger now by updating the row of the prod_details table.
Testing the MySQL AFTER UPDATE Trigger
Let’s update the quantity of the product of id 1 in the prod_details table.
UPDATE prod_details
SET quantity = 30
WHERE id = 1;Code language: SQL (Structured Query Language) (sql)
If the query executes successfully, the price should be updated from 23 to 30 in the prod_details table and a new row should be inserted in the q_details table. Let’s check by displaying both tables.
SELECT * FROM prod_details;Code language: SQL (Structured Query Language) (sql)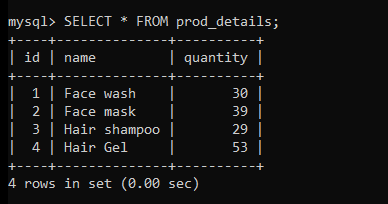
The quantity is updated. Let’s check the q_details table now.
SELECT * FROM q_details;Code language: SQL (Structured Query Language) (sql)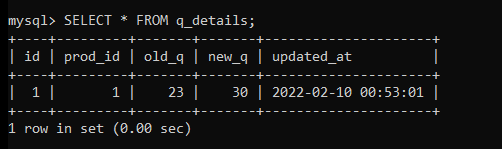
As you can see, the new row is inserted into the table. That means the trigger worked perfect and fine.
Let’s update the row of the prod_details table one more time to check if the trigger works the same.
UPDATE prod_details
SET quantity = 90
WHERE id = 4;Code language: SQL (Structured Query Language) (sql)
SELECT * FROM q_details;Code language: SQL (Structured Query Language) (sql)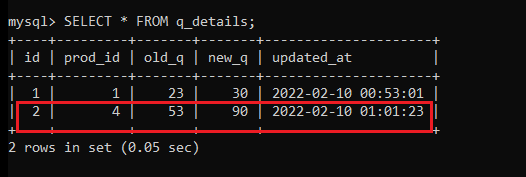
As you can see, the new row is inserted into the q_details table; that means the trigger works perfectly.
Conclusion
In this tutorial, we learned the MySQL AFTER UPDATE trigger concept with a simple yet effective example. I hope you have understood the AFTER UPDATE topic now. You can try multiple triggers on this topic to improve your knowledge. See you in the following tutorial.