In this tutorial, we will learn what is AFTER INSERT trigger in MySQL, its syntax, limitations and a few examples. In the previous tutorial, we learned about the BEFORE INSERT trigger which is pretty similar to the AFTER INSERT trigger but the AFTER INSERT trigger has few restrictions. We will cover everything in this tutorial, so stay with us till the end!
Introduction and Prerequisites
Before getting started, you should possess basic knowledge and understanding of MySQL triggers. If you are a beginner to the MySQL triggers topic, you can go through our guide on introduction to MySQL triggers. We are covering all the types and points in the MySQL triggers topic as individual tutorials, so we recommend you to go through all tutorials if you want to understand this topic effectively.
MySQL AFTER INSERT trigger activates after the insertion operation takes place in the table. It is somewhat different from the BEFORE INSERT trigger because you can change the data before inserting it in the table using BEFORE INSERT. But in the AFTER INSERT trigger, you can not update the new row that is being inserted.
Syntax of MySQL AFTER INSERT Trigger
You can create MySQL AFTER INSERT trigger using CREATE TRIGGER statement exactly like any other triggers. Following is the syntax to create the trigger.
CREATE TRIGGER trigger_name
AFTER INSERT
ON table_name FOR EACH ROW
[trigger_order]
trigger_bodyCode language: SQL (Structured Query Language) (sql)
Where,
- trigger_name – This can be any name but no two triggers of the same name can reside in the same database.
- trigger_order – This is the order in which the trigger activates. If two or more triggers are associated with the same table then you can use FOLLOWS and PRECEDES keywords to specify the order in which triggers should activate. However, trigger_order is an optional parameter.
- trigger_body – The set of operations after trigger activates are written in the trigger body. You can also have multiple SQL statements and those can be written inside the BEGIN…END statement.
If you want to write multiple statements inside the trigger body, you can use BEGIN…END block. Remember to change the delimiter first from semicolon to any other sign/symbol like Ampersand, brackets, slash or anything. Following is the syntax for multiple statements inside the trigger body.
DELIMITER //
CREATE TRIGGER trigger_name
AFTER INSERT
ON table_name FOR EACH ROW
[trigger_order]
BEGIN
trigger_body
END
DELIMITER ;Code language: SQL (Structured Query Language) (sql)
Where,
- BEGIN…END – It is a block in which you can write multiple SQL statements to perform specific operations.
- DELIMITER // – changes the delimiter from (;) to (//).
- DELIMITER ; – changes the delimiter from (//) to (;).
Example of AFTER INSERT Trigger
To demonstrate the use of the AFTER INSERT trigger, we need two tables. So, we will create two tables where in the first table, we will store the id and student name. In the second table, we will store the student id and registration date which will be calculated by the trigger based on the data in the first table. Note that, the second table will fill automatically when the trigger activates.
Creating the tables
We will create a table stud_names first and insert data into it. After that, we will create a stud_details table and insert dummy data to ensure the table can hold correct values.
CREATE TABLE stud_names(
id INT PRIMARY KEY AUTO_INCREMENT,
name VARCHAR(100)
);Code language: SQL (Structured Query Language) (sql)
INSERT INTO stud_names(name)
VALUES("Raj"),("John");Code language: SQL (Structured Query Language) (sql)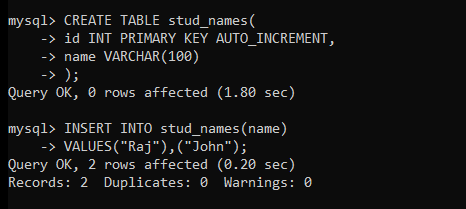
Let’s display the table data.
SELECT * FROM stud_names;Code language: SQL (Structured Query Language) (sql)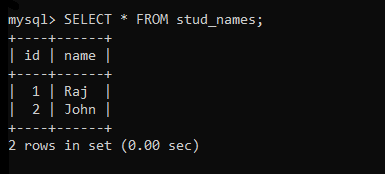
Let’s create a table stud_detetails now to store the student id, name and registration date. The student id will be generated automatically by fetching the id from the stud_names table.
If you notice, we are calculating the student id based on the auto-incremented id of the first table. For example, let’s say the id of student in stud_names table is 1 then the student_id in stud_details table would be something like 1*****.
CREATE TABLE stud_details(
stud_id INT PRIMARY KEY,
name VARCHAR(100),
reg_date DATETIME
);Code language: SQL (Structured Query Language) (sql)
INSERT INTO stud_details(stud_id,name,reg_date)
VALUES(CONCAT(1,YEAR(CURDATE())),"Raj",NOW()),
(CONCAT(2,YEAR(CURDATE())),"John",NOW()));Code language: SQL (Structured Query Language) (sql)We are using a simple formula to generate the student_id. We are concatenating the current year and the original id of the student from the first table. Let’s display the table data.
SELECT * FROM student_details;Code language: SQL (Structured Query Language) (sql)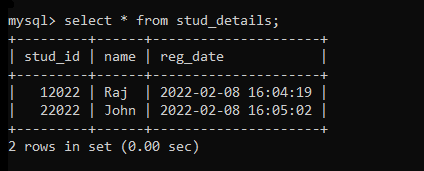
Tables are created successfully, let’s create the trigger now.
Creating an AFTER INSERT Trigger
The trigger body will generate the student_id and insert it along with the name and registration date into the stud_details table. Note that we are creating a trigger on the stud_names table.
CREATE TRIGGER afterins
AFTER INSERT
ON stud_names FOR EACH ROW
BEGIN
INSERT INTO stud_details(stud_id,name,reg_date)
VALUES(CONCAT(NEW.id,YEAR(CURDATE())),NEW.name,NOW());
END
//Code language: SQL (Structured Query Language) (sql)
Here, the id from stud_names will be picked up, concatenated with the current year and will be inserted into the stud_details table.
Let’s test the trigger now.
Testing the AFTER INSERT Trigger
We will insert the data into the stud_names table. The trigger should be activated and the stud_details should be filled automatically with the stud_id, name, and reg_date. Let’s check out!
INSERT INTO stud_names(name)
VALUES("Manju");Code language: SQL (Structured Query Language) (sql)
Let’s check the stud_names table first if the data is inserted in it. Also, check the id of the newly inserted row because it must match with the new row in the stud_details table.
SELECT * FROM stud_names;Code language: SQL (Structured Query Language) (sql)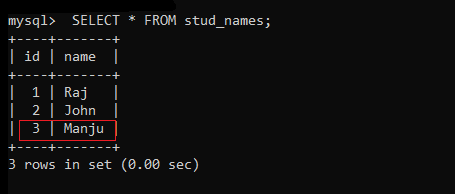
Let’s check the stud_details table now.
SELECT * FROM stud_details;Code language: SQL (Structured Query Language) (sql)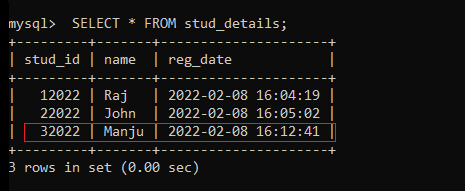
As you can see, the stud_id contains 3 which is the exact same id in the stud_names table. That means the trigger works without any error.
Conclusion
So today we learned everything about MySQL AFTER INSERT trigger. This is a pretty simple example so that you can understand how the AFTER INSERT trigger works. You can use it for even more complex problems and business logic. I hope you understood the topic very well. In the next tutorial, we will learn BEFORE UPDATE trigger.