In this tutorial, we’ll learn how to insert data into a table in a MySQL database using JDBC. For this tutorial you must have:
- MySQL on your desktop/laptop. Download and Install: https://www.MySQL.com/downloads/
- Java on your desktop/laptop. Download and Install: https://www.java.com/en/download/manual.jsp
In this tutorial, we’ll be using an IDE (Integrated Development Environment) called eclipse. If you want to use some other IDE you may use Netbeans, VSCode, or any other IDE of your preference.
You can also follow this tutorial by using notepad++ or simply the good old notepad and saving the file with the .java extension and it should work fine. To install Eclipse IDE please click on the following link: https://www.eclipse.org/downloads/
Let’s get started with the tutorial!
Also read: Connecting to MySQL Database Using JDBC Driver
Step 1: Make Sure You Have a Table Present in the MySQL Database
First and foremost, you must have a table present in java that you want to populate using a java application. For example,
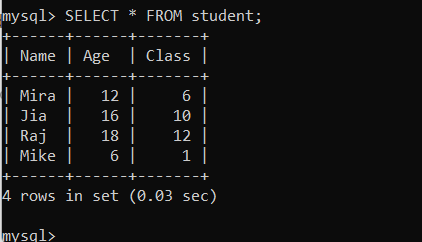
In the above example, there is a student table with three columns, namely, Name, Age, and Class to which the student belongs.
To create a table, you can use the following command:
CREATE TABLE tablename(field1 DATATYPE, field2 DATATYPE..);Code language: SQL (Structured Query Language) (sql)Step 2: Open Eclipse IDE and Create an InsertData class
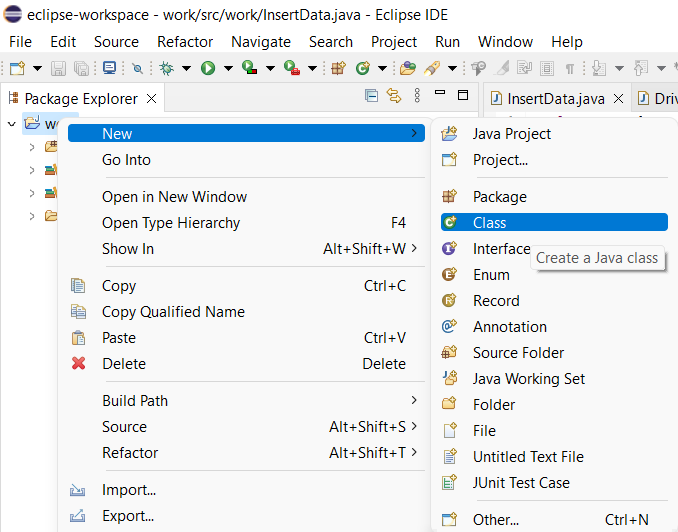
If you already have a java project on which you’re working, you can simply right-click over the project, click on the new, and select class. You can name the class as InsertData or any other appropriate name.
If you’re using Eclipse IDE for the first time you can follow the steps:
1. Create a Project
Go To File -> New -> Java Project. A pop-up window will appear, you can enter the name of the project and go with the default settings and create a new project.
2. Create a Class Within the Project
After creating a new project, right-click on the project name on the left side of the screen and create a new class.
Again, let the default settings remain as they are and give the class an appropriate name.
Step 3: Inserting the Data Into the Table Using the Java Application
Inserting the data into the MySQL database through a java application is achieved by using JDBC drivers, you can refer to the previous tutorial to understand JDBC drivers better.
There are basically four steps involved to achieve the target:
- Create a Connection: Firstly, we have to establish the connection using driver manager between the java application and MySQL database by providing the database name, username, and password for the database.
- Create Statement: To fire a SQL query we first need to create a statement.
- Execute Query: Write down the query and execute it, in our case, we will write an insert query.
- Close Connection: At the end of executing, we must close the connection.
Below is the code for inserting data into the MySQL database using JDBC, you must write this code within the InsertData class you just created:
package work;
// Work is the project name, therefore work package is imported here

import java.sql.*;
import java.sql.Connection;
import java.sql.DriverManager;

public class InsertData {

	public static void main(String[] args) {

		String url = "jdbc:MySQL://localhost:3306/db";         //db is the name of the database
		String user ="root";
		String password = "root";

		try {

			//1. Create a connection
			Connection myConn = DriverManager.getConnection(url,user,password);

			//2. Create a statement
			Statement myStmt = myConn.createStatement();

			//3. Execute Query
			String sql = "insert into student "
					+"(Name, age, class)"
					+ " values ('Matt', 13, 7)";
			myStmt.executeUpdate(sql);
			System.out.println("Insert complete.");

            //4. Close connection
			myConn.close();
		}

		catch(Exception e){
			e.printStackTrace();
		}
	}
}Code language: Java (java)
We are inserting name, age, and class as Matt, 13, and 7 respectively. You must change the values as per your database requirements.
Always remember that you must keep the JDBC connection code inside a try block as it can throw exceptions.
After writing the code, run the code as Java Application, after successful execution you’ll get the output on the console as “Insert Complete.” as shown in the below image. If you will now write the print statement then you will not get the console output but still, the application will be able to insert the data properly.

This is how you insert the data into a table from a java application.
If you want to check if the database is updated with the value, you can fire the below query on the MySQL command line or MySQL workbench:
SELECT * FROM tablename;Code language: SQL (Structured Query Language) (sql)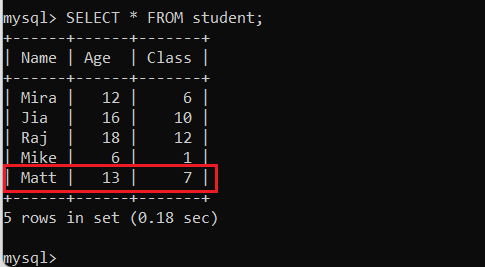
In the above image, you can see the table is populated with the values we used in our java code.
That’s how we insert data into a MySQL table using JDBC.
Conclusion
JDBC is a powerful API that enables you to easily insert data into a MySQL database. It provides a variety of methods for inserting data, which makes it easy to use and ensures accuracy. By using JDBC, you can quickly and easily add data to your MySQL database.
Resources:
https://dev.MySQL.com/doc/connector-j/8.0/en/connector-j-usagenotes-connect-drivermanager.html