
In this tutorial, we will learn how to add a new column to the table in an easy way. Along with it, we will see how we can add more than one column to the table and how to add a new column before or after a particular existing column. This is going to be a quick guide on the MySQL add column so stay read the tutorial till the end so that you won’t miss any part. Here we go!
Before We Start
Before we start, note that MySQL doesn’t provide the ADD COLUMN statement to add a new column directly. Instead, the ADD COLUMN statement is used along with the ALTER TABLE statement. The ALTER TABLE statement helps to modify the table structure whereas the ADD COLUMN statement adds the new column to the table.
MySQL also provides us with a feature to add a new column previous or after to a particular existing column. This can be done using the MySQL workbench interface or PHPMyAdmin as well. However, we will use the MySQL CLI in this tutorial to learn the concept.
Syntax of ADD COLUMN in MySQL
As stated earlier, we can’t use the ADD COLUMN statement directly. Instead, we have to use the ALTER TABLE command first and then use the ADD COLUMN statement to add a new column. Following is the correct syntax to add a new column to the table.
ALTER TABLE table
ADD [COLUMN] col_name col_definition [FIRST|AFTER existing_column];Code language: SQL (Structured Query Language) (sql)
Where,
- ALTER TABLE – It modifies the table structure to add a new column. It is a DDL command.
- ADD COLUMN col_name – It adds a new column to the table. Notice, the COLUMN keyword is optional.
- col_definition – specify the definition of the column such as datatype.
- FIRST|AFTER existing_column – This adds the column to the table at the very first or after the specified existing column. If not specified, the new column will be added at the end.
To add more than one column, the following syntax is used-
ALTER TABLE table
ADD [COLUMN] column_name_1 column_1_definition [FIRST|AFTER existing_column],
ADD [COLUMN] column_name_2 column_2_definition [FIRST|AFTER existing_column],
...;Code language: SQL (Structured Query Language) (sql)
You can add as many columns as you want using the ADD COLUMN statement.
Example of ADD COLUMN in MySQL
To demonstrate the use of the ADD COLUMN statement, let’s create a table first.
CREATE TABLE addColumnDemo(
id INT AUTO_INCREMENT PRIMARY KEY,
names VARCHAR(100),
age INT,
city VARCHAR(100)
);Code language: SQL (Structured Query Language) (sql)
Here, we have created a table addColumnDemo to store the student names, ages and cities. So, we have a total of three columns here. Let’s insert some values into the table.
INSERT INTO addColumnDemo(names,age,city)
VALUES("John",21,"Austin"),("Doronto",19,"LA"),("May",20,"NY"),
("Albert",21,"NY"),("Bob",20,"LV"),("Opra",21,"Boston");Code language: SQL (Structured Query Language) (sql)
Let’s display the table data now to check if the data is inserted successfully.
SELECT * FROM addColumnDemo;Code language: SQL (Structured Query Language) (sql)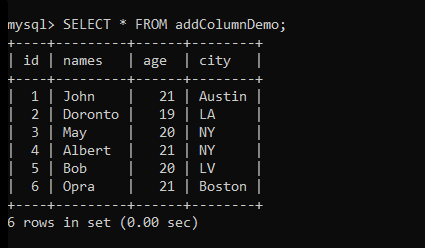
Add Single Column to the Table
Now, let’s add a new column “gender” to the table after the age column.
ALTER TABLE addColumnDemo
ADD COLUMN gender VARCHAR(10) AFTER age;Code language: SQL (Structured Query Language) (sql)
Here, we have added a new column to the table. Note that, as the column is newly added, all rows will contain the value NULL in the table. So, we have to insert the values in the new column.
Here, we will add the gender “male” to all rows.
UPDATE addColumnDemo
SET gender = "male";Code language: SQL (Structured Query Language) (sql)
The above query will add the gender “male” to everyone. Let’s display the table to check if the values are correctly inserted.
SELECT * FROM addColumnDemo;Code language: SQL (Structured Query Language) (sql)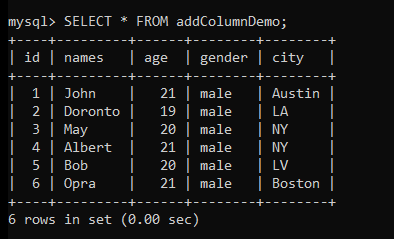
As you can see, the new column is added to the table and new values are also inserted successfully.
Add Multiple Columns to the Table
In the previous example, we have added only a single column but in this example, we will try to add two columns in one query.
Here, we will add two columns at the end – designation and phone number.
ALTER TABLE addColumnDemo
ADD COLUMN designation VARCHAR(100),
ADD COLUMN phone VARCHAR(10);Code language: SQL (Structured Query Language) (sql)
The above query will add the column “designation” first and then the column “phone”.
Let’s display the table data so we can see if the columns are added to the table.
SELECT * FROM addColumnDemo;Code language: SQL (Structured Query Language) (sql)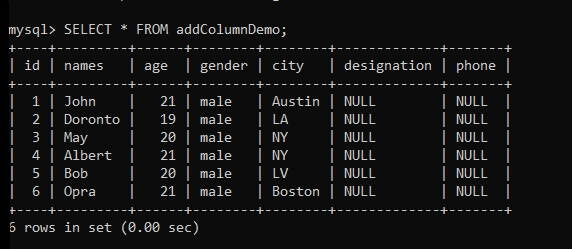
As you can see, the columns are added to the table successfully.
Note that, there is no statement like the IF EXISTS to prevent the error if the column already exists in the table. So, you should check the table before adding a new column.
You can use the DESC statement to check the table description. Alternatively, you can also use the SELECT statement and print the table data where you can see column names.
You can check the table description by the following query-
DESC addColumnDemo;Code language: SQL (Structured Query Language) (sql)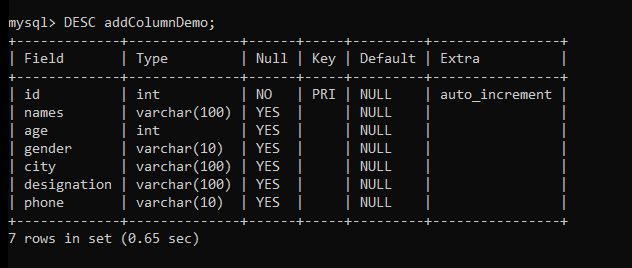
Here, you can see the names of columns in the field column of the table.
Conclusion
In this tutorial, we learned to add a single column as well as multiple columns to the table. We have seen the syntax of both methods with examples. And finally, we saw how we can check the table columns using a simple query. This is a simple topic that won’t take a long time to understand. I hope you find this tutorial helpful. If you like this tutorial, don’t forget to share it with your friends!