In this tutorial, we will learn what BIT datatype, its syntax, its examples and how to convert the data from and to the BIT datatype is. This is going to be an exciting tutorial, so stay tuned till the end, and you will learn everything about the BIT datatype in MySQL.
Introduction to BIT in MySQL
BIT is one of the data types in MySQL, which is used to store the bit values in the range of 1 to 64. It is a beneficial data type and is used often when you want to store true or false values in the table.
As the name suggests, you can store the BIT values in the BIT datatype column, which are in the form of 0 and 1. If you try to insert the integer value, it will be automatically converted into BIT values. However, the integer value you are inserting must be in the range when converted into BIT values.
For example, the column BIT(3) can store the value up to 111, which is 7 in integer form. If you try to insert an 8 integer value in the column, you will get an error because 8 is written as 1000 in binary or BIT format.
Now let’s see the syntax to specify a BIT data type.
Syntax to Define BIT Datatype
Following is the correct syntax to define the BIT datatype.
BIT(M);Where M is the range of the value, which can be in the range of 1 to 64. If you skip the M parameter, MySQL will consider it as 1. So, the following two statements are equivalent.
colName BIT(1);

colName BIT;Code language: SQL (Structured Query Language) (sql)
You can insert the integer value into the BIT column. But it will be converted into bits before inserting into the table.
Also, you can insert bit values such as 111 and 101. However, if you try to insert bit values directly, those will be considered integer values and again converted into bits.
Therefore, to insert bit values into the table, you can use B’value’ notation. For example, B’11’ will insert bits 11 and represent 3, whereas only 11 will try to insert 1011 and represent 11.
Now let’s see some examples of the BIT datatype.
Examples of BIT Datatype
Here, we will create a simple table with a BIT data type. And we will try to insert different values into that table to see what type of values does column accepts.
CREATE TABLE bitDemo(
id INT AUTO_INCREMENT PRIMARY KEY,
number BIT(3)
);Code language: SQL (Structured Query Language) (sql)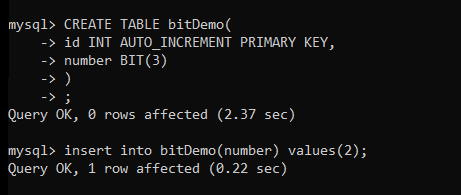
Here, we have inserted the value 5 into the table. Let’s see what we have received in the table.
INSERT INTO bitDemo(number) VALUES(5);
SELECT * FROM bitDemo;Code language: SQL (Structured Query Language) (sql)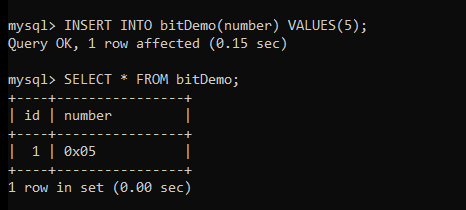
As you can see, we had inserted the value 5, but it didn’t get inserted as an integer value.
Now let’s try inserting value 8. In BIT format, 8 is represented as 1000. But, our column is defined for a range of only 3. So, we should get an error if we try to insert values greater than 7.
INSERT INTO bitDemo(number) VALUES(8);Code language: SQL (Structured Query Language) (sql)
As you can see, we get an error “Data too long for column”.
Now, what if we want to store bit values literal into the column? For this, we can use the B’value’ notation. Check below-
INSERT INTO bitDemo(number) VALUES(B'111');
SELECT * FROM bitDemo;Code language: SQL (Structured Query Language) (sql)
Here, we insert 111, which is represented as 7 in the integer. Let’s run the query and see what we get in the table.
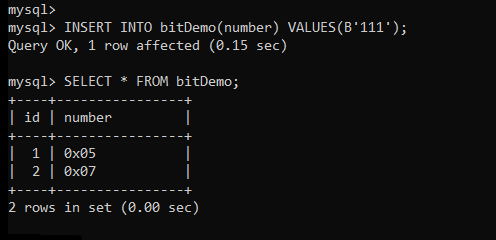
As you can see here, we have received 0x07 in the table.
Did you notice anything strange here?
Yes, the values we are inserting into the table are not displayed in the form of bits. To display the values into the binary/bits representation, we use the BIN() function. The following example demonstrates how to display bit column values in the form of 0s and 1s.
SELECT id, BIN(number) FROM bitDemo;Code language: SQL (Structured Query Language) (sql)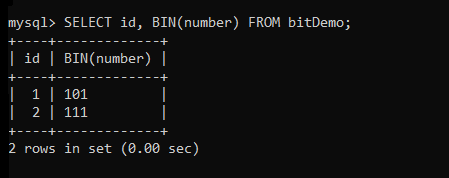
As you can see, we have received the values in the form of 0’s and 1’s.
Now, what if you want to display these values in integer format?
To perform this, we can use the CAST functions.
SELECT id, CAST(number AS SIGNED) as bitToInt FROM bitDemo;Code language: SQL (Structured Query Language) (sql)Here, we are trying to cast the bit datatype to the SIGNED INT datatype.
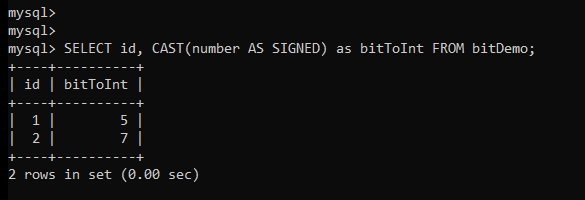
As you can see, we have received the expected output, which is in integer format.
Conclusion
A bit is a very helpful datatype, and as mentioned in the introduction, you can use it in multiple scenarios. I hope you understand what bit datatype is, how to use it, and how to convert it from and to the bit. If you found this tutorial helpful, don’t forget to share it with your friends. Stay tuned to mysql.com for more exciting tutorials.
References
MySQL official documentation on bit datatype.
