In this tutorial, we will learn about the LOOP statement in MySQL. It is very similar to the other loops in MySQL such as REPEAT and WHILE but has a different syntax. This is going to be an interesting tutorial because we will see two examples of the LOOP statement to understand it in a better way. So, let’s get started!
Also read: 3 Ways To Use Loops in MySQL Stored Procedure
Introduction to LOOP in MySQL
The LOOP statement in MySQL is used to iterate the block of code repeatedly. Unlike the other loops such as WHILE and REPEAT where we specify a certain condition with the name of the loops, for example- WHILE condition, REPEAT…UNTIL condition, the LOOP statement doesn’t need a condition to be specified. Instead, we write a condition inside the loop body and use the LEAVE statement to get out of the loop.
Inside the LOOP loop, you must use a conditional statement so that the loop won’t iterate for infinity. That’s what makes it different from the other loops in MySQL.
Syntax of LOOP in MySQL
The syntax of the LOOP statement is slightly similar to other loops. Following is the syntax of the LOOP statement.
Simple LOOP Statement Syntax
[label:] LOOP
    statement_list
END LOOP [label];Code language: SQL (Structured Query Language) (sql)
Where,
- label – It is similar to the variable name which is given to the loop block. It is optional but writing it is a good practice.
- LOOP – It is a statement to specify a loop.
- statement_list – The set of valid SQL statements that perform a certain task.
- END LOOP – It specifies the END of the loop.
The statement_list is executed repeatedly and it might consist of one or more valid SQL statements.
LEAVE Statement Inside the LOOP Syntax
As we do not specify any condition at the beginning or at the end, we should terminate the loop somehow to pass the control out of the loop. To accomplish this, we use the LEAVE statement with a condition. When a certain condition becomes true, we use the LEAVE statement to break the loop.
The following syntax shows how the LEAVE statement is used inside the LOOP statement.
[label]: LOOP
    ...
    -- terminate the loop
    IF condition THEN
        LEAVE [label];
    END IF;
    ...
END LOOP;Code language: SQL (Structured Query Language) (sql)
In the above syntax, when the IF condition is satisfied, the LEAVE statement executes and breaks or exits the loop. It is very similar to the BREAK statement available in other programming languages such as C, C++ and Java.
ITERATE Statement Inside the LOOP Syntax
Along with the LEAVE, you might use the ITERATE statement to skip the next statement in the current loop and start the loop again. It is similar to the CONTINUE statement in other programming languages such as C++, Java and PHP.
Following is the syntax to use the ITERATE statement.
[label]: LOOP
    ...
    IF condition THEN
        ITERRATE [label]
    END IF;

       -- terminate the loop
    IF condition THEN
        LEAVE [label];
    END IF;
    ...
END LOOP;
Code language: SQL (Structured Query Language) (sql)
Examples of the LOOP in MySQL
Now let’s see examples of the LOOP statement. We will first see the example to demonstrate the use of the simple LOOP statement. Then we will see the use of the ITERATE statement inside the loop.
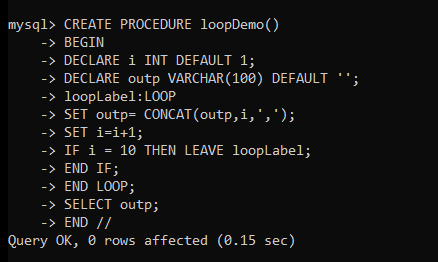
Example 1- Print 1 to 9 digits using the LOOP statement.
DELIMITER //
CREATE PROCEDURE loopDemo()
BEGIN
DECLARE i INT DEFAULT 1;
DECLARE outp VARCHAR(100) DEFAULT '';
loopLabel:LOOP
SET outp= CONCAT(outp,i,',');
SET i=i+1;
IF i = 10 THEN LEAVE loopLabel;
END IF;
END LOOP;
SELECT outp;
END //
DELIMITER ;Code language: SQL (Structured Query Language) (sql)
Here, we have declared two variables- i and outp to iterate the value from 1 to 9 and to hold the output result respectively. Then we used the MySQL CONCAT function to concatenate the digits from 1 to 9 into a single string.
We have set the condition IF i=10 which means when the value of i becomes 10, exit the loop. Notice here, we first concatenate the string, then increment the value of i and lastly check the condition. So, when the digit 9 is concatenated to the string, the value of i becomes 10 and the condition is satisfied. After that, control is handed over to the next statement outside the loop.
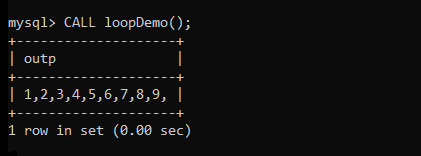
Finally, we use the SELECT statement to print the result. Let’s now call the stored procedure to check if the LOOP statement works correctly.
CALL loopDemo();Code language: SQL (Structured Query Language) (sql)
As you can see, we have got the expected output.
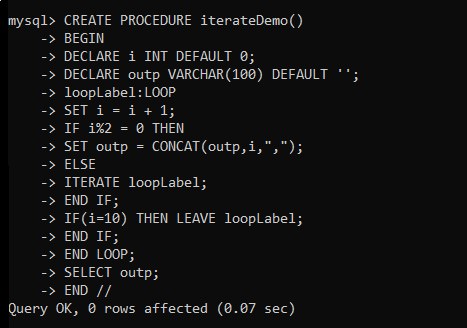
Example 2- Print only even numbers from 1 to 10.
DELIMITER //
CREATE PROCEDURE iterateDemo()
BEGIN
DECLARE i INT DEFAULT 0;
DECLARE outp VARCHAR(100) DEFAULT '';
loopLabel:LOOP
SET i = i + 1;
IF i%2 = 0 THEN
SET outp = CONCAT(outp,i,",");
ELSE
ITERATE loopLabel;
END IF;
IF(i=10) THEN LEAVE loopLabel;
END IF;
END LOOP;
SELECT outp;
END //
DELIMITER ;Code language: SQL (Structured Query Language) (sql)
In the above LOOP, we have used the two variables similar to the previous example. Inside the loop, we first increment the value of i by +1. Then we used the IF i%2 (mod operator) to check if the given number is even. If the number is even then we concatenate the number with the previous output. If the number is not even, control goes to the ELSE block and the ITERATE statement executes. Then the control goes directly to the starting point of the loop.
As soon as the value of i becomes 10, the IF block executes and control goes to the next IF block where we check if the value of i is 10. If the value of i is 10 then we break the loop using the LEAVE statement and the control goes outside the loop.
Finally, we use the SELECT statement to print the result.
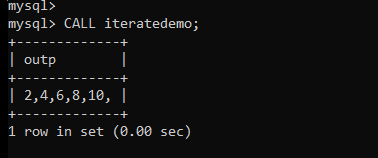
Let’s now test the stored procedure by calling it to check if our LOOP works correctly.
CALL iteratedemo;Code language: SQL (Structured Query Language) (sql)
As you can see, we get all even numbers between 1 to 10.
Summary
In this tutorial, we learned –
- Introduction about the LOOP and how it’s different from other loops.
- Syntax of the simple LOOP statement.
- Syntax of the LOOP with the LEAVE statement.
- Syntax of the LOOP with the ITERATE statement.
- Two examples of the LOOP statement.
I hope you find this tutorial helpful. Don’t forget to share it with your friends so that your friends will learn the concept in a better way too. See you in the next interesting tutorial!
